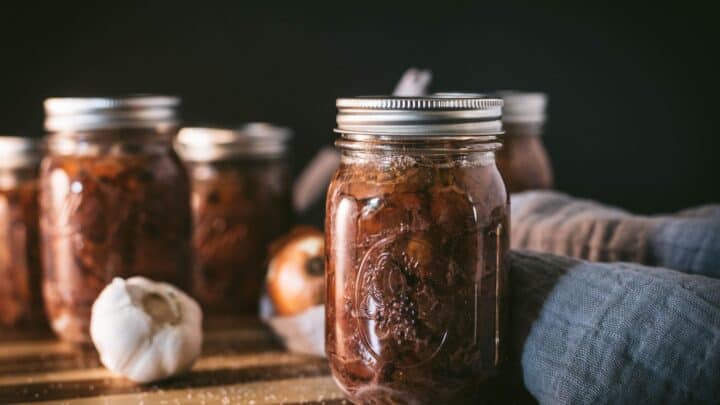
Absolutely nothing beats venison. It's a goal of ours to harvest our limit of deer every season to fill the freezer to feed our family since we can't raise many animals for meat (aside from poultry) on our one-acre homestead. This gives us a sustainable, healthy, and inexpensive source of meat to feed us for the year. It also takes up a ton of freezer space. So, we typically can up part of it. Canned venison is great to use for quick meals on busy days or just as a shortcut to something wholesome and delicious.
After we butcher a deer, we usually age it and then package it up in vacuum seal bags to fill our freezer with an abundance of delicious red meat. And I don't see us not doing that any time soon. Absolutely nothing beats a delicious backstrap steak on the grill. But, freezer space is at a premium and if the power goes out it can result in a lot of wasted meat.
We strive to waste as little as possible and believe in nose-to-tail use of the meat we hunt as well as raise. As such, I've been becoming more and more interested in preserving meat without refrigeration with some old-fashioned methods. But canning meat is something I feel confident in doing and is an incredibly simple way to preserve that has been done for decades.
Residential refrigeration has only been available since 1913 and wasn't commonplace until the mid-1940s. I remember an older woman I knew when I was younger that was born in 1913 telling me a story about them getting electricity for the first time when she was 6 years old. Pretty amazing. They definitely didn't have a refrigerator, let alone a great big deep freezer.
Canning meat was popularized a lot during WWI and became a popular method of meat preservation all the way up until the mid-1940s when refrigeration was more readily available and accepted.
How To Can Venison
Canning venison is surprisingly easy. I wouldn't even steer away from a novice from trying their hand at it. This method can also be utilized to can other wild game such as elk or bear and can even be used for beef or pork.
A Note On Pressure Canning
First and foremost, you must use a pressure canner to safely can any meat, including venison. Putting it in a water bath is not safe and things you cannot smell or see could be in that jar of meat.
I know some people are really afraid of using a pressure canner. Which makes things like canning broth and meat impossible. But, using a pressure canner is not really all that difficult. I've been using pressure canners and cookers in some capacity my entire adult life. My mom used a pressure cooker multiple times a year my entire life. Nothing bad ever happened. And using a pressure canner allows you to can so many more foods... safely.
Canning food safely is just one of those things I won't back down from. It's not worth the risk to me or my family and friends. So, make sure you can do this properly using a pressure canner. They're worth their weight in gold, they really are.

Raw Pack or Hot Pack?
There are two ways of canning venison. One is to raw pack, which is just like it sounds. You pack raw meat into a warm, sterilized jar. The other is to brown the meat before packing, called hot pack.
Both result in safe, delicious canned venison. However, a lot of folks say that taking the extra step to brown the meat results in a more flavorful product. Does it? Maybe. But, I have 3 kids, my husband works off the homestead 60 hours a week and I have other things to do. To me, it's just not worth the extra step and mess that it makes. So, I raw pack.
If you do choose to hot pack, you simply put some olive oil in a skillet and brown the meat like you would make a stew that was to simmer all day. Once it's done browning, but you're not done working your way through all the meat, you need to keep it warm. A slow cooker is a great way to do this. If you don't have one or don't want to pull one out, a 5-quart pan with a bit of broth in the bottom (so the meat doesn't stick) placed on low heat on the stovetop will do the trick. See? Extra dishes. But, if you want to and you have the time, go for it.
Do I Need to Add Anything To the Jar?
You don't have to add anything to the jar at all. Not even water. This usually comes as a surprise to people, but the meat actually creates enough of its own liquid that it isn't necessary to add any extra.
I always add salt to savory canning recipes. Some people swear by adding a cube of pork fat, I think that's silly and takes away from the flavor. Just like when we make burgers, I never add ground pork or lard to the burger. They taste less like venison and more like beef to me.
I do choose to add some onion to the jars. It's not necessary, it just brings out some flavor, and in most recipes, I use canned venison in utilize onions anyway. Another quick easy addition is a clove of garlic. Some people choose to add herbs and/or pepper all of those things are fine. None of them will affect the time you need to can the meat.
It's really up to you whether or not you add anything beyond meat to the jars. Try a few different things if you want. Add some herbs to one, maybe a bay leaf or some thyme. Add a clove of garlic to one. Be creative and think about how you like your venison seasoned when you prepare it fresh (or from the freezer). I suggest the salt as it brings out some of the flavors, but you don't have to.
Use High Quality Venison to Can
This is important. Just like all foods, the final product is only as good as what you put into it. We hunt and process our own deer for this very reason. We can see the deer in the field before we take the shot and we are able to see the meat on the bones after it is harvested to ensure it's healthy.
I know not everyone has room to process deer in their home. We certainly don't have room to hang it, but I do have a trick for aging the meat that I will share with you and keeping the amount manageable so that just about anyone could process their own.
We did use to take our deer to a butcher, but we weren't happy with the results and I like gaining the skills to butcher and process our own. Anyway, make sure the meat is healthy.
You will want to remove any fat, bruised pieces, gristle, and silver skin. Most deer, of course, don't have a ton of fat and gristle, but all of these things give the final product an off-putting flavor and it's not very palatable. Kinda hard to chew. So, cut all of that off (that you can). You can give it to your chickens or dogs for a tasty treat or render it down if you're feeling spunky.
Can I Use Previously Frozen Meat?
Yep. If your freezer goes out and you have way too much meat to even attempt to consume in a short period of time, you can absolutely can it. You will just want to make sure it is not freezer burnt and thawed out before you begin.
Cubed or Sliced Meat And Packing Your Jars
Whether you slice your meat into thin strips or cube it up is entirely up to you. Depending on what you're going to use it for can help determine what you do with it. In fact, if you wanted, you could slice a few up (these go great on sandwiches) and cube some up (which is great for stew) and process them together.
You just need to make sure the meat will fit and that you pack your jars as tightly as you can. You don't have to be super finicky about it, just try to get them packed nice and tight.
How to Store and Use Canned Venison
Canned venison will keep for a long while when stored properly. Simply make sure you keep it in a cool, dark place and you can enjoy it for months to come. You will want to remove the rings after you have checked for a proper seal and label with the contents and date. We have a pantry cabinet we keep all of our canned foods in.
It also makes it super easy to put a meal on the table. It's great over mashed potatoes or a bed of rice. You can use it in stews, for tacos or fajitas, to make a quick sandwich, or even just heated up as is.
You have to give this a try, it makes all of that canning stuff seem incredibly easy once you do. You don't have to cook it or do any real prep work other than slicing the meat up which makes the whole process a little less daunting. I hope you try it and enjoy it!
Other Wild Game Posts You'll Love:
📖 Recipe

Easy Canned Venison
Make meals a cinch with this easy canned venison recipe. Eat it as is warmed up or on a bed of rice or mashed potatoes or use it as a quick addition to soups, stews, chili, and sandwiches.
Ingredients
- 6 Pounds Venison (cut into 1" cubes or sliced into thin strips)
- 6 teaspoons Salt (divided)
- 3 Tablespoon Onion (diced, divided) optional
- 6 Cloves of Garlic (divided) optional
Instructions
- Start by sanitizing your jars and washing lids and rings. I generally sanitize my jars in the dishwasher and just wash the lids and rings before getting started on canning day.
- Cut the venison into 1" cubes or thin slices trying to make sure to remove as much fat and silverskin as possible.
- Chop up onion and separate garlic cloves from bulb of garlic removing the outer shell.
- Pack the jars tightly with meat, a ½ Tablespoon of chopped onion, and one clove of garlic. I usually add the garlic and onion to the bottom and pack the meat on top of those.
- Leave a generous 1" of headspace at the top. If you see a lot of air pockets, use a spatula along to remove the air pocket and push the meat down into the space. You want this to be as tightly packed as you can manage, but you probably won't get all of the air pockets. That's ok, just get as many of the big ones as you can.
- Once you have the jars packed, sprinkle ½ teaspoon of salt onto the top of the meat.
- Wipe the jar rim with a clean, damp cloth and center the lid on the jar. Tighten the ring to finger tight.
- Place the jars in your pressure canner. Add about 3" of water and a Tablespoon of vinegar to your canner. Tighten the lid to the top.
- Start with high heat and allow the water to come to a boil until steam begins escaping the vent. Allow canner to vent for 10 minutes.
- Place the weight on the vent. You'll need a 10 pound weight under 1,000 ft and 15 for over 1,000 ft.
- Allow the canner to come to pressure. Once the weight starts jiggling, reduce the heat to medium. You should continue to see and hear your weight jiggle every 10 to 15 seconds once you reduce the heat.
- Process pint jars for one hour fifteen minutes. You can can this in quarts, which you will process for 90 minutes.
- Once the jars have processed, turn off the heat and allow the canner to come down to 0 pressure naturally. Once the canner reads 0 pressure, carefully remove the lid and allow the jars to sit for another 2 minutes.
- Remove the jars to a towel-lined counter to sit undisturbed for 12 to 24 hours before checking the seal. Store good seals in a cool dark place. If one doesn't have a good seal, place in the refrigerator to eat within a few days.
Notes
You can add bell pepper and/or herbs of your choice to flavor your meat differently.
Recommended Products
As an Amazon Associate and member of other affiliate programs, I earn from qualifying purchases.
Nutrition Information:
Yield:
24Serving Size:
½ CupAmount Per Serving: Calories: 171Total Fat: 3gSaturated Fat: 2gTrans Fat: 0gUnsaturated Fat: 1gCholesterol: 90mgSodium: 593mgCarbohydrates: 0gFiber: 0gSugar: 0gProtein: 34g
Nutrition information may not be accurate.


Betty Dotseth says
Awesome suggestions!
Greg Boos says
I was wondering about the salt that you add to the venison. Is this just regular table salt or pickling salt? Iodized or non? Thank you.
Danielle McCoy says
Regular table salt is fine. We use sea salt and that's all we typically have on hand, any salt will work.. whatever you have.
Barb Nellis says
I read this article and didn't find how to age meat.
Danielle McCoy says
Aging venison is beyond the scope of this article and you do not need to age it prior to canning.
Heather says
Thank you for this article. I’m excited to try canning venison this afternoon. Just FYI- your reader asked about aging beef because in your post you stated “but I do have a trick for aging the meat that I will share with you...” I read to the bottom to see the trick as well.
Danielle McCoy says
Thanks for pointing that out, Heather. It's on my list to fix! Time has gotten away from me, it's actually an entire article.
Earl says
Step 9 says "Start with high heat and allow the water to come to a boil until steam begins escaping the vent. Allow canner to vent for 10 minutes." Does that mean you leave the canner on high while venting for 10 minutes?
Danielle McCoy says
Yes.
Melissa Wittman says
We have hunted and eaten wild game year-round. In fact, the license plate on my truck reads "ELK YUM" and my husband's is "EATNELK"! This is my first try at canning the meat and I'm very excited. How long would you say a jar would last in a cool dark place?
Danielle McCoy says
At least a year.
Beth says
@Melissa Wittman, I have kept canned venison in basement 4+ years with good results.
Danielle McCoy says
Yes, as long as the seals are still intact, the food inside is good. They're guaranteed for a minimum of 18 months, but most will last much longer when stored properly.
Sandy says
I enjoyed your article. We used to can venison, are thinking of canning it again. I came to find out what you put in jars besides venison. We didn't add anything, but will try some of your suggestions. I am curious about the vinegar in the water of the canner. What is the reason for it? Thanks, Sandy
Danielle McCoy says
The vinegar keeps the water from leaving deposits on the canner and the jars is all.
Walter R Kotecki says
The things you talked about and did in your canning process is almost word for word to what my wife and I did for many years. It sure made preparing meals easy down the road, even to the point of experimenting with different flavors/spices etc, . Really enjoyed reading your article. I also canned a good bit of steelhead trout. A lot better than canned salmon, no skin just pure fish.
Danielle McCoy says
That sounds delicious, Walter! Not a lot of trout where we live, unfortunately, but that sounds so, so good.
Terina says
I would like to point out that you do not age venison. They do not have the enzymes that cows have and the meat will rot and not age.
Danielle McCoy says
This is false. All venison should be aged for a minimum of 24 hours and will benefit from a bit longer of a process. After the deer, or any other mammal, is killed, glycogen in the muscle is converted into lactic acid which causes the muscles to shorten and contract (rigor mortis) which makes the meat tough, no matter how long you freeze it after butchering. If you butcher it that quickly your meat will continue to be very tough. It takes a minimum of 24 hours for the lactic acid levels to begin to drop, the muscles loosen and the enzymes begin to break down the connective tissue. This process happens in all mammals. Even squirrels, rabbits, and birds benefit from at least a little aging.
Venison doesn't need aged as long as beef, but a minimum of 24 hours after harvesting the deer is necessary if you don't want your meat to be tough. Optimal aging times are typically 7 to 10 days depending on the age of the deer itself. If you're doing it properly, in a temperature, humidity controlled environment it will age. The meat should be kept not colder than 32 degrees and not warmer than 40 degrees and in a low humidity environment. This environment will keep bacteria at bay which is what causes decomposition and allow enzymes to break down the connective tissues and "age" the meat.
Kristine Spangenberger says
@Danielle McCoy, I couldn't agree with you more. I have grown up in a hunting household and we "aged" every deer and elk religiously to ensure that we were preparing the best version of our hard earned meat. My dad has always just hung the carcass or quarters in the garage at appropriate temps. I loved your canning article. I'm going to try it with elk for the first time tomorrow. Looking forward to it and more tips on your site. Thanks! Kristine
Judy says
@Terina, My husband tender ages his venison in fridge at 38 degrees for 14 days. I previously didn't enjoy venison but I do now the way he ages it. Just saying!! We all do things different and what works for us. Best to you and all others reading this great website.
Tricia Stauffer says
Help! Please. I just canned some antelope I thawed. One of the jars boiled over. You can smell it in water. What do I do with the meat now? Is it all bad? First and possibly my last time I can meat.
?
Danielle McCoy says
It sounds like your jar probably siphoned. This can happen because of extreme temperature differences (packing very cold meat into jars and placing them into a canner that is already boiling), or the headspace wasn't correct. The meat in the overflowed jar can be consumed within 3 days as long as you refrigerate it after it is cooled. Alternatively, you can reprocess the jar by repacking into a clean jar and using a new lid.
Allie says
Hi I’m new to canning and everything, but I was just curious about not having to add liquid to it? Does it just create its own juices in the pressure cooker? I’ve had canned venison before and there was a liquid to it, totally curious, thank you in advanced 🙂
Danielle McCoy says
Yes, as the meat is cooked the natural liquid from the meat is released into the jar.
Dolores says
I recently canned some venison (first time). Haven't tried it yet. I have been searching for other sites that are canning venison and came across yours. Have heard that someone put in some bouillon and just wondering if you've tried this and how did you like it??? Thanks!!!
Danielle McCoy says
I can't speak to this as I've 1)never tried it and 2)cannot find reliable information on the safety of utilizing bouillon in canning meat. While I've found plenty of recipes that contain it, I couldn't figure out if it was considered safe. I would imagine it is, but I would also imagine since the ingredients in bouillon are mainly salt that it would create a very, very salty meat. So, while I wouldn't necessarily advise against it (it's probably perfectly fine) I probably wouldn't like the flavor. Maybe try one like that and see if you like it?
Mike says
I know I'm late to the party here, but using bouillon is perfectly safe, but will definitely affect the flavor. Most commercial bouillon contains predominantly salt, reduced beef stock, and often MSG and other additives, so definitely omit the salt if you use it.
My family has been pressure canning venison almost exactly like this awesome recipe. I use this cold pack method for deer I've hunted in the North Woods, because they taste rich and, well, venison-y. Using bouillon will overpower that flavor, which may be good if you have picky eaters, I guess.
Down by us in Illinois and Indiana, the majority of the animals' diet is corn and soybeans, so they taste more like beef than venison. That's when I add low sodium beef base when cold packing like this, and maybe a bay leaf and a few peppercorns. I also like to hot pack some by searing the cubes on a raging charcoal or wood fire until nicely browned on all sides, then once they're packed I top up the jars with homemade beef or venison stock. Great for stew and pot pies, just leave an inch of headspace and poke out all the air bubbles.
Awesome site by the way! Making your pickled Brussels sprouts next 🙂
Elle says
Thanks for all of your input! I appreciate it!
Lee D. says
How many jars do you get out of the 6 lbs? Pints or Quarts?
Danielle McCoy says
As mentioned at the top of the recipe, it makes about 6 pints.
Marie says
Can you eat canned meat right out of the jar or do you have to bring it to a boil before eating?
Danielle McCoy says
You can eat it straight out of the jar, but it tastes better warmed slightly. It does not need to be boiled.
Kate O'Bryan says
Kudos on the excellent article; I've been butchering and canning my own venison since high school, and this is almost exactly my process as well. Besides the onion and garlic I add in a sprig each of thyme and rosemary, along with a couple whole peppercorns and crushed juniper berries at the bottom. My dad recently suggested trying a hot pack with barbeque sauce added in as the liquid. I'm skeptical, but he swears by it so it might be worth a try. Thanks again for the great article!
Danielle McCoy says
Oh hot pack with barbecue sounds delicious, actually! Your additions sound delicious as well. Glad you enjoyed it!
Adam says
Hi, great article! Could I use an instapot to can the meat, and if so what would be different on the cooking instruction? Thanks you so much.
Danielle McCoy says
No, you can't use an instapot to can. I recommend my article on how to use a pressure canner (different than a pressure cooker), and the top pressure canners (there is an electric version). Hopefully that helps. Good luck!
Andy Bach says
1st time canning meat, did 10 quart sealers of elk, love the taste. Only question being, is there a time limit or way if you would want the meat not to be fall apart tender? As is, it would be difficult to make into stew, or even a soup, as it would all be shredded. Would like it to be more of a stew type texture, with actual chunks of meat that don't fall apart
Danielle McCoy says
Thank you for sharing your experience! It’s wonderful to hear that your first time canning elk went well and that you love the taste. To answer your question, the longer pressure canning times needed to ensure safety often result in very tender meat. If you're looking for a chunkier texture, you might try starting with larger, firmer cuts of meat and cutting them into larger chunks before canning. You could also experiment with slightly less tender cuts, as they tend to hold together better. Either way, it’s a blessing to have such delicious and versatile canned meat on hand!