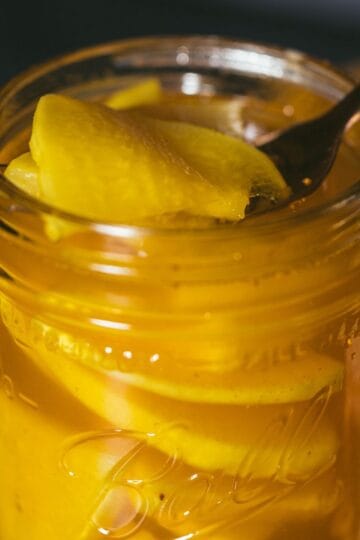
Preserve the last of your summer harvest with these tangy, crisp, and wildly underrated pickled green tomatoes. Whether you make a quick fridge version or water-bath can them for winter, this is the best way to save your unripe tomatoes from frost and turn them into something unforgettable.

Green tomatoes, still clinging to the vine as the season winds down, have a habit of piling up right when everything else is winding down. Sure, you could fry them. You could try to ripen them on the windowsill. But hear me out...
Pickling them might be the best thing you do all year.
These tart, crunchy green tomato pickles are bright, punchy, and deeply satisfying. Whether you want to quick-pickle a small batch for the fridge or can them for long-term storage, this guide walks you through both methods... no fluff, no waste, just real food preserved with purpose.
Why You'll Love These Green Tomato Pickles
Tart, tangy, and crisp. Perfect for burgers, beans & cornbread, or straight from the jar.
Versatile recipe. Make a dill or bread & butter version.
Quick or canned. Refrigerate or water bath can.
Great way to use up green tomatoes before frost hits.
No waste! Uses unripe tomatoes you’d otherwise toss.
The Best Tomatoes for Pickling

This recipe is designed for firm, unripe red tomatoes. Not heirloom varieties that are green when ripe (like Green Zebras).
- Smaller tomatoes like Romas or cherry tomatoes work best: slice in half or pierce with a fork.
- Larger tomatoes like beefsteaks can work if unripe and firm: slice into wedges or chunks.
🍅 Tip: Skip soft or juicy tomatoes, they’ll get mushy.
Ingredients
This makes about 6–7 pints for canning (or halve it for refrigerator pickles).

Base Ingredients
- 5 lbs green tomatoes, halved or wedged
- 1 cup onion, sliced (optional, but tasty)
- 3 cups distilled white vinegar (or apple cider vinegar, 5% acidity)
- 3 cups water
- ⅓ cup pickling salt
For Garlic Dill Pickles:
- Fresh dill or dill seed
- Garlic cloves
- Yellow mustard seed
- Black peppercorns
- Pickling spice
For Bread & Butter Pickles:
- Yellow mustard seed
- Celery seed
- Ground turmeric
- Allspice berries
- Whole cloves
- Red pepper flakes
🧂 Optional: Pickle Crisp (for canned version only, helps maintain crunch).
Quick Pickled Green Tomatoes (Refrigerator Version)

This method is fast and no canner required.
Wash and prep jars. Wash glass jars and lids in hot, soapy water or run them through the dishwasher.
Make your brine. In a saucepan, combine vinegar, water, salt, sugar, and your chosen spices. Bring to a boil, then remove from heat.
Pack the Jars. Layer tomatoes, onion, garlic (if using), and any whole spices tightly into jars.
Add Brine. Pour hot brine over tomatoes, covering them completely. Let cool. Seal with lids and refrigerate.
Let them sit 24-72 hours before enjoying... the longer, the better.
🧊 Keeps up to 1 month in the fridge.
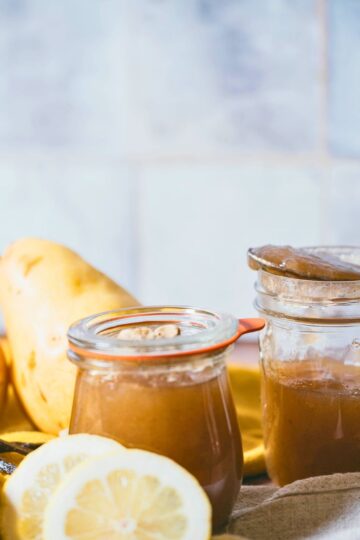
Water Bath Canned Pickled Green Tomatoes

Prep jars and canner. Wash jars, lids, and rings. Fill your water bath canner with a rack and enough water to cover jars by 1–2 inches. Preheat jars in simmering water (180ºF).
Make your hot brine. Combine vinegar, water, salt, sugar, and your chosen spice blend in a pot. Bring to a boil, stirring to dissolve.
Pack hot jars. Add tomatoes, onions, and any extras like garlic or dill. Pour hot brine over, leaving ½ inch headspace. Remove air bubbles. Wipe rims, add lids and rings (finger tight).
Process in boiling water bath. Place jars in boiling water canner. Process pints for 15 minutes, adjusting for altitude. Turn off heat and let sit 5 minutes before removing jars.
Cool & store: wait 12–24 hours to check seals. Store sealed jars up to 18 months.
How to Use Pickled Green Tomatoes

- On burgers, hot dogs, or venison sandwiches
- With fried fish (especially bluegill!)
- On charcuterie boards
- Alongside beans and cornbread
- Or right from the jar while standing in your kitchen, barefoot.
There’s something soul-satisfying about turning the end of season’s leftovers into something bold and bright. These pickled green tomatoes are a little unruly, a little unexpected — and completely worth your time.
So when those green tomatoes come in by the bowlful, you’ll know just what to do.
More Pickles You'll Love:
- Pickled Brussels Sprouts (Frog Balls)
- Easy Honey Pickled Carrots
- The Best Pickled Green Beans Recipe (Dilly Beans)
📖 Recipe

Pickled Green Tomatoes (Quick or Canned)
These tart, crunchy pickled green tomatoes are the perfect end-of-season preserve. Make a small batch of refrigerator pickles or water bath can them to enjoy all winter. Choose from two brines... classic garlic dill or old-fashioned bread & butter. Tangy, salty, and wildly good.
Ingredients
Base Ingredients:
- 5 Pounds Green Tomatoes
- 1 Cup Onion Slices (optional)
- 3 Cups Distilled White Vinegar
- 3 Cups Water
- ⅓ Cup Pickling Salt
- Pickle Crisp, divided, optional for canning
For Garlic Dill Pickles
- 3 ½ tablespoon Dill Seeds (or add one sprig to each jar when packing)
- 6 Garlic Cloves, peeled, crushed
- 2 teaspoon Black Peppercorn
- ½ Cup Granulated Sugar
- 2 teaspoon Pickling Spice
- 2 teaspoon Mustard Seed
For Bread & Butter Pickles
- 1 ¾ Cup Granulated Sugar
- 1 ½ tablespoon Celery Seeds
- 3 tablespoon Yellow Mustard Seed
- 1 teaspoon Turmeric Powder
- ½ teaspoon Allspice Berries
- ½ teaspoon Whole Cloves
Optional for Canning Version
- Pickle Crisp (⅛ teaspoon per pint jar)
Instructions
For Refrigerator Pickles
- Wash your jars and lids. Hot soapy water or a spin through the dishwasher. No need to sterilize for fridge pickles.
- Make your brine. In a saucepan, combine vinegar, water, salt, sugar, and your chosen spices. Bring to a boil, then remove from heat.
- Prep the veggies. Cut tomatoes into wedges or chunks. Slice onion. Peel garlic, if using.
- Pack the jars. Tuck tomatoes, onion, and garlic (if using) into clean jars, packing tightly but not crushing.
- Add hot brine. Pour over the veggies, leaving about ½ inch headspace. Let cool completely, then lid and refrigerate.
- Wait 1–3 days. Flavor deepens with time. Eat within 1 month for best texture and taste.
For Water Bath Canning:
- Prep your jars and canner. Wash jars and lids. Heat jars in simmering water (180°F). Fill canner with water and heat.
- Make the brine. Combine vinegar, water, sugar, salt, and spices in a pot. Bring to a boil and keep hot.
- Pack the jars. Fill hot jars with tomatoes, onion, and garlic/spices. Add optional Pickle Crisp.
- Add brine. Cover contents with hot brine, leaving ½ inch headspace. Remove bubbles and wipe rims. Apply lids and rings finger-tight.
- Process in water bath. Place jars in boiling water canner. Process pints for 15 minutes (adjust for altitude below). Let jars rest 5 minutes in the water, then remove.
- Cool and store. Let sit 12–24 hours. Remove rings, check seals, and store in a cool, dark place.
Notes
Green tomato tips: Use firm, unripe red tomatoes (not heirloom green-when-ripe types). Cherry tomatoes work great — just halve or pierce them with a fork.
Pickle Crisp: Totally optional, but helpful if you want extra crunch in the canned version.
Brine flavor: Bread & butter is sweet-spiced and warm. Garlic dill is punchy, sharp, and classic. Make both and see which you like best.
Storage: Fridge version lasts 1 month. Canned version keeps at least 12-18 months if stored in a cool, dark pantry.
Altitude Adjustments for Canning:
- 0–1,000 ft: 15 minutes
- 1,001–3,000 ft: 20 minutes
- 3,001–6,000 ft: 20 minutes
- 6,001–8,000 ft: 25 minutes
- 8,001–10,000 ft: 30 minutes
Nutrition Information:
Yield:
80Serving Size:
¼ CupAmount Per Serving: Calories: 38Total Fat: 0gSaturated Fat: 0gTrans Fat: 0gUnsaturated Fat: 0gCholesterol: 0mgSodium: 29mgCarbohydrates: 8gFiber: 1gSugar: 7gProtein: 1g
Nutrition information is automatically calculated and is not guaranteed to be accurate. I’m not a nutritionist... just a home cook sharing what works in my kitchen. Please use your preferred calculator if you need exact values for dietary needs or medical conditions.


Priscilla says
This looks great. I love tomato pickles with peas, beans, or fried catfish. This recipe looks awesome.
How many pints or quarts of pickles will this make?
Thanks!
Priscilla.
Danielle McCoy says
This will yield roughly 5 quarts or 10 pint jars.
Hailey says
Can I use regular white vinegar for this?! I just cannot stand the taste of apple cider vinegar so we usually substitute!!
Thanks!
Danielle McCoy says
You sure can!
Cassandra Brecht says
I only have a few pints' worth of cherry tomatoes that I would like to use your recipe for. Is this recipe scaleable down? Also, I'd rather not can them and leave them as refrigerator pickles...any changes I should make for that?
Thanks so much!
Danielle McCoy says
Yes, you can scale it down since all you're doing is pouring the brine over the tomatoes. You just need to wash your jars, pour the brine in, and place them in the refrigerator. I'd allow them to sit a minimum of 48 hours before eating. They'll keep for about a month this way.
Beatrix says
Thank you so much for sharing this recipe! Is there any reason to not use whole small cherry tomatoes? Any reason that they must be cut aside from perhaps better flavor absorption?
Danielle McCoy says
I would cut the cherry tomatoes in half, yes it is going to provide better flavor for your tomatoes, the skin is so thick, especially on green tomatoes that the flesh won't be very pickled.
Debra says
Love your recipes
Leslie Lemieux says
Can't wait to try this recipe out
Mae says
Are these still crisp after water bath canning? I like to have a little crunch to my pickle and am worried that they will become too soft after 15 minutes of processing time. I’m asking because I want to try this out, but also don’t want to get my hopes up too high if you know what I mean.
Danielle McCoy says
Any home canned pickle is going to be less crispy than a store-bought pickle, that's just the nature of things, unfortunately. You can add pickle crisp to each pint at approximately 1/8th of a teaspoon per quart before adding anything else to the jar, it will help.
Everett says
Tried the recipe last year, was disappointed w/ mushy tomatoes, and and not a lot of garlic/dill flavor. suggestions for this season? thanks
Danielle McCoy says
Home canned pickles of any kind are typically mushier than store-bought. That being said, make sure the tomatoes you're using are still very firm, they should be since they're green but make sure, and you can add pickle crisp to each jar to help keep some of the crunch. You'll add approximately 1/8th of a teaspoon to each pint before putting anything else in the jar.
To get more garlic and dill flavor, you can add more to the brine mixture and it will still be safe to can and be sure you're letting them sit for a few weeks before eating and shake them up when you open them. Hope these tips help.
Jacqueline says
I just got them in my Water bath Canner. They look awesome! Thanks for this recipe. I had so many green tomatoes!
Danielle McCoy says
I hope you enjoy them as much as we do!
Bruce Sokol says
Can I cut this recipe in half? And how long should I process 1/2 pint jars?
Danielle McCoy says
You can cut it in half. Half-pints would still need to be processed for 15 minutes.
Judy David says
Why do these need water bathed? My mom never water bathed pickles, as the vinegar prevented spoilage. Also, shouldn’t I use 5% vinegar?
Danielle McCoy says
Water bathing makes these pickles shelf-stable by killing any potential pathogens when heated. Without the water bath, they aren't shelf stable and would need to be kept in the refrigerator. Apple cider vinegar as well as regular distilled vinegar contains a minimum of 5% acetic acid and is perfectly safe for pickling.
Rose says
how do I make a small batch of bread and butter tomatos
Danielle McCoy says
You can halve the recipe.
Toni says
Hello from Edmonton Alberta Canada 🙂
We had to race against the clock last Saturday(its Wednesday night as I write this) and I'd love to try to pickle my green tomatoes. I have a ton left that are too small to slice for frying. We had to get them before the frost did, and i just have not, and will not, have time to do anything with them before this Saturday. Some have been sitting covering my kitchen table and are being eaten as they ripen. My question is as long as they are not ripe and are still very green, can I still pickle? Or would it be a better idea to just be ready next year and make jam this year? I'm thinking a water bath canning process would just make them squishy if they're already getting soft. Appreciate the help!!!!
Danielle McCoy says
You can pickle them as long as they are green, if they're not firm, they won't be particularly green (in my experience). They don't star super firm after water bathing, but firmer than a red tomato, if that makes sense. You can always pickle a few as quick pickles and put them in the fridge to see if you like them, they will stay more firm that way, they just won't last as long. That way you can see if you like them and pickle more next year. Or, if you have a ton and really want long-term storage, they'll be fine as long as they are green.
Toni says
@Danielle McCoy, I think I'll try. There are still enough of them that are very firm that I should be able to get a decent batch. Seriously interested in trying these 🙂
Toni says
@Danielle McCoy, I got them done!!!! Doesn’t look like I can add a picture from my phone though. They look beautiful. I’m hoping they taste as good as they look. Thank you for sharing your recipe!!!!!
Danielle McCoy says
You can on social, but not on here. So glad you had a chance to make them, enjoy!
Anne says
Hi there - would you recommend yellow or black mustard seed for the bread and butter version of this recipe?
Thanks!
Danielle McCoy says
Hi Anne, I would recommend yellow mustard seed as it is milder.
Phyllis says
Neighbor had a 5 gallon bucket of different sized green tomatoes. Recipe was "easy" and no trouble for canning so we can enjoy these in the middle of winter. I used the Bread and Butter spices and they are good, but I think next fall I will try plain sugar instead as I do not like that they look brown inside the canning jar. P.S. only used the small ones for pickling, the big ones for canning sliced green tomatoes for frying, and then the medium ones for Pomodoro Verdi sauce.
Danielle McCoy says
Plain sugar will work fine in these, the flavor will just have a bit less molasses to it. Glad you enjoyed them! The small ones are perfect for pickling.
L says
Why are the spices left dyed twice in these recipes?
Danielle McCoy says
It was a glitch on the recipe card itself, I think I fixed it.
Donna says
I made some with jalapeño and dill. Why did I have what looked like a milky color after they were sealed and setting 2 days? I didnt know if I need to throw them out. They sealed great.
Danielle McCoy says
It's great that your pickled green tomatoes sealed well! The milky color you're seeing is not uncommon and can often be due to a few factors that don't necessarily mean your pickles have gone bad.
Water Quality: If you used hard water, the minerals in it can sometimes cause a cloudy or milky appearance. Using distilled or filtered water in future batches can help avoid this.
Table Salt: If you used table salt instead of pickling or kosher salt, that could also contribute to cloudiness. Table salt contains additives like anti-caking agents, which can cause a milky look in pickling brine.
Since your jars sealed properly and there's no unusual odor or signs of spoilage, the cloudiness is likely harmless. In the future, you could try using pickling salt and filtered water to see if that helps with clarity.