Brussels sprouts, they're usually something you love or you hate, but these easy pickled brussels sprouts (or frog balls) will turn even the most hesitant brussels sprouts eater into a fan.

I've been really into pickling to preserve food lately. It is one of the oldest forms of food preservation, dating back to ancient Mesopotamia. But while most people today think of pickles as the familiar pickled cucumbers in dill pickles and bread and butter pickles, I've been trying my hand at pickling all sorts of foods.
I've pickled and canned the all-familiar pickled peppers, but I wanted to expand my pickling knowledge further than just peppers and cucumbers. I hesitantly tried pickled cranberries, and I absolutely loved them. Which, to be honest, was kind of shocking because the combination of pickling brine and cranberries sounded gross.
So, when I found out that pickled brussels sprouts are a thing and that they're eloquently called frog balls, I had to try them. Personally, I love brussels sprouts and am happy to enjoy them during the holidays while they're in season. My family, on the other hand, aren't super big fans.
I figured what the heck, I could try preserving some yummy brussels sprouts by pickling them... and just maybe some of the family will like them. And guess what? They did!
If you're not a big brussels sprouts fan, pickling them is definitely the way to go, the flavor is so much different than a steamed or boiled sprout on your dinner plate.
How to Make Pickled Brussels Sprouts

Prepare jars and canner. Even if you aren't canning these frog balls, you still need to wash your jars and lids in hot soapy water and heat up the jars for at least 10 minutes to sterilize them. So put them in your canner or a pot of water and bring it to a boil while you prep everything else.
Wash and prep the brussels sprouts. Wash the brussels sprouts, remove the outer leaves and cut off the ends. Then, slice each sprout in half lengthwise.

Blanch the brussels sprouts. Whether you're canning or not, I've found blanching them really helps. It brightens them and if you're not canning them, it cooks them enough so you can actually eat them, otherwise they're just too hard.
If canning, place in boiling water for 2 minutes and then immediately submerge them in an ice bath to stop the cooking process. If you're not canning these, boil them for 3 minutes and then submerge them into the ice bath to stop the cooking process.
Boil the brine. Combine vinegar, water, and canning salt in a large pot and bring it to a boil while you pack the jars with the brussels sprouts.
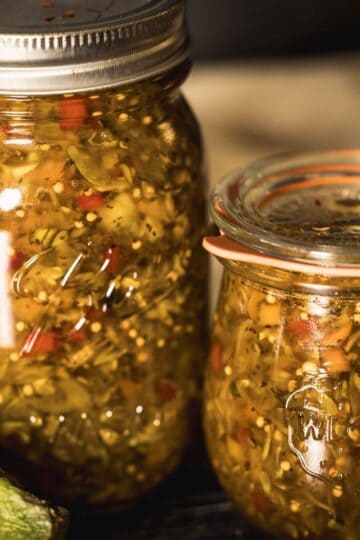
Pack the jars. Pack brussels sprouts into jars, top with a garlic clove, some diced onion, some diced jalapeno, mustard seed, and peppercorns.

Add the brine. Pour the brine over the brussels sprout mixture leaving half-inch of headspace. Then, run a plastic air bubble remover through the jars to remove air and mix the spices into the jars a little better. Adjust headspace if necessary.
Wipe jar rims, center lids, finger tighten bands.
Process jars in a canner (if desired). Place packed jars in the waiting canner and be sure they're covered by at least 2" of water. Place the lid on the canner and bring it to a boil. Process in boiling water for 15 minutes before removing to a towel-lined counter to leave undisturbed for 24 hours before checking seals. Allow the jars to sit one to seven days before enjoying for the best flavor.
Quick pickled brussels sprouts instructions. After packing jars, cool to room temp and then place in refrigerator. Allow them to sit for one to seven days before enjoying them. These will keep in the refrigerator for up to two months.

Ways to Use Pickled Brussels Sprouts
- Use them in fresh salads for a nice zest.
- Put on a charcuterie board.
- Enjoy them all by themselves.
- Serve them alongside a bloody mary.
📖 Recipe

Pickled Brussels Sprouts
These flavorful pickled brussels sprouts are a great addition to your appetizer tray or served alongside a bloody mary.
Ingredients
- 2 ½ lbs Brussels Sprouts
- 3 Cups Water
- 3 Cups Vinegar (5% acidity)
- 1 ½ teaspoon Canning Salt
- 6 Garlic Cloves
- 6 tablespoon Onion (diced)
- 6 tablespoon Jalapeno (diced)
- 3 teaspoon Peppercorns (divided)
- 3 teaspoon Mustard Seed (divided)
Instructions
- Prepare canning jars, lids, and water bath canner. Bring jars in the canner to a boil and boil for ten minutes, whether you're canning them or not.
- While the jars are warming to sterilize, prepare the brussels sprouts by removing the outer leaves and trimming off the hard ends then slice each brussels sprout in half lengthwise.
- Place the halved brussels sprouts in a pot of lightly salted boiling water and boil them for 2 minutes if canning, and 3 minutes if not.
- Remove the brussels sprouts from the boiling water and put them in an ice bath to stop the cooking process.
- In a large pot bring to boil the vinegar, water, and canning salt, reduce heat and allow mixture to simmer for ten minutes.
- Pack brussels sprouts into prepared jars. Top them with one clove of garlic, 1 tablespoon of diced onion, 1 tablespoon of diced jalapeno, ½ teaspoon of peppercorns, and ½ teaspoon of mustard seed.
- Pour pickling brine over the mixture, leaving ½" of headspace. Using a plastic bubble remover, place it in the jar and remove all of the bubbles, this will also distribute the spices around a bit. Adjust for headspace if necessary.
- Wipe jar rims, and center lids, and place bands on jars to finger tight.
- If canning, place in a water bath canner, ensuring the jars are covered by at least 2" of water, put the lid on the canner, bring to a boil and process for 15 minutes before removing to a towel-lined counter and leaving them undisturbed for 24 hours before checking for proper seals.
- Let canned pickles sit for 1-7 days before enjoying for best flavor.
- If not canning, place them in the refrigerator and allow them to sit for a minimum of one day, but up to one week for better flavor.


Jen says
I was about to try this recipe and then realized that I didn't see anything about the number or size of jars that you needed. Could you add that information?
Danielle McCoy says
It makes approximately 6 pints, which is included on the recipe card.
Tess says
Hello,
Could you substitute balsamic vinegar for regular vinegar as long as it has 5% acidity or greater? Thank you.
Danielle McCoy says
Great question! As long as the balsamic vinegar is labeled as 5% acidity or higher, it should be safe for pickling. However, keep in mind that balsamic has a much stronger, sweeter flavor than regular vinegar, which will significantly change the taste of the final product. If you're looking for a milder alternative, you could try a mix of white vinegar and balsamic or use apple cider vinegar for a hint of sweetness. Let me know if you give it a try—I'd love to hear how it turns out!
Krista W says
Do they have to stay in the fridge or can I store them in the cellar with the pickled onions, beets etc?
Elle says
If you water bath can them, they can stay in the cellar with the rest, yes.
Deb says
These are excellent!! Don’t hesitate to make. It’s easy and well worth the effort.
Elle says
So glad you like them, Deb!