
I think having a garden is the first step to starting your homestead. So, When we moved to our current property a few years ago, we tilled up a spot and started a garden bed. And we've grown a traditional row garden for the few years we've been here with marginal success. But, now? I'm ready to broaden our horizons and plan a raised bed garden for next spring.

I'm planning it in late summer so we can get a few beds made up before the cold hits. That way, we can plant earlier in the spring. Plus, I want to plant garlic and it's time to do that soon, so instead of putting it in the existing plot, we are going to build a bed specifically for this purpose before it gets too cold.
Raised beds have a lot of benefits over traditional row gardens and I can't wait to mix things up and grow more food next spring!!
Benefits of Utilizing Raised Bed Gardening
I can't wait to get our raised beds in for next spring. I like our typical row garden, don't get me wrong, but the bending, tilling, weeding, repeat is a lot of work. And our soil is far from fantastic, so I constantly have to do things like plant cover crops and amend it to try to improve the health and drainage of the beds. Raised beds have a ton of benefits over traditional row gardens. Here are a few.
Less space but larger harvests
Raised garden beds don't have to take up a ton of space, but you can plant a lot in them. Unlike a traditional row garden, you don't need to walk between the rows, so plants can be planted a little closer together. You'll just need to make sure you can reach across the bed... A lot of people turn raised beds into square foot layouts and you can fit a ton of food in a tiny space.
We will be able to grow substantially more food in the same amount of space our original garden took up. Which, when you're trying to become more self-sufficient and grow more of your own food, is always a bonus.
Improved Soil and Better Drainage
Our soil is less than spectacular. It's clay-like, and the drainage leaves a lot to be desired. Does it grow food? Sure! But, it requires a lot of intensive effort on our part and isn't as productive as it could be.
When you make raised beds, you get to choose nice, loamy soil and compost to add to them. Also, if the best place to put your bed is a little on the wet side, it will drain better and not leave your plants drenched and prone to disease and rot.
No Tilling
Which is better for the soil! Instead of having to till everything up in order to add compost and amendments every year, raised beds can just have mulch, compost, and other materials added to the top of them. The worms and roots will do all of the work for you. Saving you time and your back.
Plant Your Garden Earlier
Since the soil drains better than in a traditional row garden, it dries out faster and warms up more quickly. This means that you can usually get your plants in the ground earlier in the spring. This would have been great for us this year as the ground wasn't ready for planting until very late. If we had raised beds, we would have had the ability to plant earlier and had an easier time covering crops with cold frames to protect them from late-season frosts and cold snaps.
Less Weeding
Our first year with our row garden went pretty well. The second-year? It was a weed bed with a few vegetable plants in it. I couldn't, no matter what I tried, keep up with the overwhelming amount of weeds.
The overwhelming amount became a problem partially because the garden was tilled up. Tilling spreads the seed around, which results in more weeds. Instead, with raised beds, you can easily cover your beds with black plastic, or even cardboard, in late winter/early spring to kill off anything that started growing.
Also, when you plant your plants a little closer together? It gives weeds far less room to infiltrate and come up. Win-win.
How to Plan Your Raised Garden Beds

Choose Your Material(s)
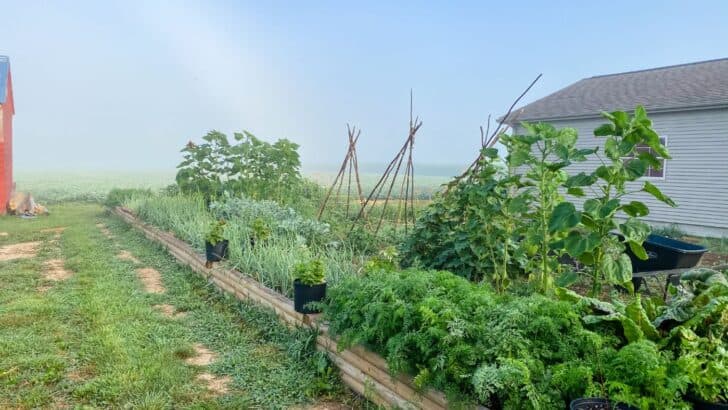
I'm always inspired when I look at photos of other people's raised beds. The number of materials used and creativity never cease to amaze me. Your options are far from limited which, to me is awesome. Originally, we were going to make all of our beds one style, but we've since changed our minds. I'm sort of a hodgepodge person. And I think our garden should reflect that. We have several different materials lying around to utilize for making our beds, so instead of going out of our way and spending a lot of money, we will build them out of what we have readily available.
Untreated Lumber
I don't know about you, but we have quite a bit of scrap lumber sitting around from various projects. And when I think of raised beds, the typical wood-framed beds are generally what come to mind. Wood is inexpensive and wooden beds look pretty good... for a while.
The con to using untreated lumber is... it doesn't last forever. So, eventually, you're going to have to replace it. But, I think I'll take the route of inexpensive beds using materials we have lying around over going into debt for them any day.
I do not recommend utilizing treated lumber including pressure treated as well as railroad ties. Railroad ties are soaked in creosote and I don't want my food growing up against that. Pressure-treated lumber is treated with alkaline copper quaternary, which the EPA says is okay for food crops. But... I'll form my own opinion on that and steer clear.
Decay Resistant Wood
Pine is inexpensive, but it doesn't last long. Decay-resistant wood will still need to be replaced, but it will last longer than pine. However, it can be difficult to find and relatively expensive in comparison. Redwood, cedar, and oak are the typical woods associated with decay resistance.
The con... again, is the price. It can cost upwards of $150 to make a single bed out of cedar or redwood. That's pretty pricey and I'm not trying to break the bank. But, if you can afford it, the wood will last a lot longer before needing to be replaced.
Stone
I've seen some pretty neat stone garden beds on Pinterest and Instagram. From the simple and straightforward to the more involved, mortared type. Mortaring is far from necessary, though.
The benefit of stone beds is you honestly don't need any tools. Just some time and a little creativity and you'll have yourself a neat-looking, cottage-style garden bed.
This is a great option if you have a lot of rock lying around your property. But, if you don't, it can be pretty costly to purchase stones large enough to create a bed. I have, however, seen a lot of people on Facebook wanting someone to come rid them of their excess stone, which would be perfect for a garden bed, for little to no cost. Definitely worth looking into.
Cinder Block
Utilizing "cinder block" to make garden beds to grow food in is an endlessly debated topic. Google the safety of utilizing cinder blocks to grow edible plants and you'll have a plethora of information at your fingertips on whether or not it is safe.
I honestly haven't the slightest. But, I do know, from research, that most new blocks are concrete. And the few that aren't using pumice as a filler, not the fly ash that was used in old, true cinder blocks. Concrete is heavier and more durable.
Cinder blocks are readily available and fairly inexpensive. But... they're not the greatest if you need a bed of a certain size. They also all contain lime (cement is made from lime) and lime can, and will, leach into your soil which can change the soil composition in your beds.
Bottom line... if you have a few lying around, it's better than eating a bunch of processed junk or pesticide-laden produce from heaven knows where, in my opinion. But, I wouldn't try growing acid-loving plants like blueberries in, or around, them.
Stock Tanks
A homestead wouldn't be complete without a few stock tanks lying around. And while most of us use stock tanks for their intended purpose, there's nothing wrong with using a worn-out tank for other purposes.
Stock tanks are readily available, are the perfect size, and require very little in the way of setup. Simply drill some holes in the bottom to make sure the drainage is good, put them where you want them, and fill them with some dirt. Viola, you have a garden bed.
Galvanized Steel Panels
We have a few roofing panels left over from our chicken coop build. They're sitting, waiting on someone to do something worthwhile with them. So, I'm going to use them to build a couple of raised beds out of. As I said, the materials we have on hand are what we will be utilizing (until we run out of material, anyway).
I know Jill over at the prairie homestead built her raised beds out of some hefty steel panels. They look pretty neat, in my opinion, but... again, they're costly.
Whatever you choose to use to build your beds will be fine. Wood, as I said, is the most widely used material, but the other materials I listed above are always options. I've seen people use drainage culvert sections, brick and masonry, and even logs to build their beds. Use your imagination and I bet you'll come up with an amazing garden with unique beds.
Plan It Out
Consider What You Want to Grow
You've got your materials all selected, now it's time to plan and figure out how much you're going to need. I actually added a step to mine. Most people say pick a space, which is pretty obvious, but I decided what we wanted to grow first. It helped me determine the size of the beds and how many we would need more easily. Can we add more beds later if we decide to grow something else or grow more? Absolutely! But, this is a start and helped determine our plan moving forward.
Pick a Space
Just like starting any other garden, you need a spot. Full sun is best, of course. But unlike when you're planning a traditional garden, you don't have to worry nearly as much about drainage. Deciding what we wanted to grow helped me decide how large our garden area needed to be. And then, I made sure there was room for expansion later on if we decide to grow more crops in a few years.
Our existing bed area is where our raised beds will be. We will simply cover the area with the new beds, create paths out of mulch, and fence it in. We will fence it to try to keep the deer and rabbits out as well as our dogs are chickens... Wish me luck.
Determine Size of Beds
You'll want to make sure your beds aren't so wide you can't reach across them. Generally speaking, about 4 feet is as wide as you'll want to go. Maybe even a little shorter depending on your ability to walk all the way around the bed (if it's backed up to a fence or building where you can only reach from one side, you may want to go shorter.
The length can be any length you choose, honestly. Most of our beds will likely be 6' to 8' long, but we will have some other, smaller square beds as well. As I said, figuring out at least partially what you're going to be growing in your garden will definitely help determine the rest of your plan. But, you can always change things up. One of the great things about raised beds is nothing has to be permanent.
Determine the Layout
Part of the reason you can grow more food in a raised bed versus a traditional row garden is because the spacing can be closer. Because... you guessed it, you don't need space to walk between the rows. That being said, you'll still need space to walk between your beds! A lot of people make more narrow, footpaths. And while these work for their intended purpose (accessing your beds), you can't fit a wheelbarrow down them.
When determining the layout, you should know the size of your beds, which will help tremendously. But, you may want to skip to the next step and actually build them out. This will make it easier to visualize the space. Or, it does for me.
I can draw things on paper all day long, but it makes a lot more sense when I see it laid out in front of me. If you're great at geometry and visualizing, you don't have to skip to the next step first, it can just be helpful for us visual learners.
Remember, everyone is going to take the path of least resistance when walking around the garden. So, try to make the layout and pathways make sense for what you are initially drawn to as far as traveling around them.
If you have beds that will be specific for growing certain things, then make sure that the layout makes sense for that. Take your time on this step, because if you plan to keep the garden around for a while, you'll want this to be as perfect as it can or you'll end up wanting to rip it all up and start over. And no one wants that.
Build the Beds
Finally, the building begins! This is becoming a reality instead of just sitting there saying "well, this might work." From the simple to the mundane, now it's time to put those building skills to the test.
Whether you're building simple wood-raised beds or using stone, brick, or whatever you are, now you get to put it all together and see your dreams become a reality. I don't know about you, but I think that's cool.
Line the Bottom of the Beds
You can just put some cardboard down, or even newspaper if you want. You do not have to waste a lot of money on weed fabric which will wind up breaking down just the same as the cardboard and newspaper anyway. The reason you want to line them is to smother out all of the weeds and grass below and keep them from peeking through readily.
Is it necessary? No. You can just throw dirt in them and call it a day. But, it won't hurt anything to smother out the weeds for a bit...
Fill them Up
Yay... it's time for dirt! I love dirt. Life is always better with a little dirt on your hands. To fill your raised beds, you'll want to use a mixture of loamy soil and well-aged compost. You can add things like potting mix or vermiculite but it isn't necessary.
The best combination for your beds is going to be about 70% soil and 30% compost. Just toss it in, you don't have to mix it up. When you plant, the roots and worms will do that for you.
Maintaining Your Raised Bed Garden
Weeding is minimal, but keep on top of it
One of the best things about raised beds is they're a lot easier to keep weeds under control. At the beginning of the season, you can cover them up with black plastic or cardboard to smother out the weeds. Then, before you plant, you'll want to pull any other weeds. About once a week, you'll want to pull the excess weeds to make sure your plants don't have a ton of competition to deal with. Overall, though, weeding raised beds (in my experience) is a lot less time-consuming and difficult than tending to a row garden.
Watering
Wouldn't it be nice if once a week we got exactly one inch of rain to keep our plants and soil watered?? But, we don't live in a perfect world. While raised beds have lots of benefits and can be a great solution for people who have drainage problems or clay-like soil, they also dry out faster.
However, intensive planting will help shade the soil and keep it from drying out too quickly and compost does a pretty good job at making sure your plants get the moisture they need.
There are lots of ways you can keep your raised beds watered. From involved drip irrigation to soaker hoses, to sprinklers, and even hand watering. To gauge whether or not they need water, simply stick your hand in the soil about 3" down and see how moist it is. During dry spells, you may need to water more frequently, but I will be coming up with a post on that soon.
For now, I'm going to go out there and build a few beds and get this garlic in before it gets too late!


Jane Anderson says
Hi Danielle! Beautiful blog! I really liked this garden bed. Thanks for sharing all the benefits of using raised beds. I will try all the useful tips for planting garden beds. Thanks!
Danielle McCoy says
Of course! I hope it helps.
Julia says
So helpful! Thank you!