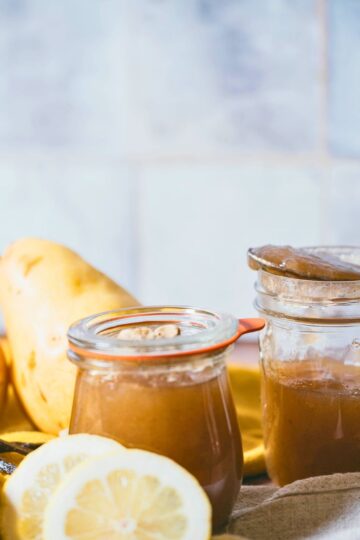
Lemon curd is a bright, tangy spread that works beautifully as a topping for toast, pastries, and scones or as a filling for cakes and tarts. While it tastes indulgent, lemon curd is surprisingly simple to make at home, and when prepared using the approved method, it can also be safely water bath canned.

Creamy, smooth, and intensely flavored, lemon curd may not seem like a candidate for home canning at first glance. Because it contains whole eggs, egg yolks, and butter, many assume it must be refrigerated or frozen only. However, lemon curd is safe for water bath canning when prepared and processed according to the tested method from the National Center for Home Food Preservation (NCHFP).
This makes lemon curd an excellent option for preserving citrus, using up extra eggs, or creating shelf-stable gifts that don’t require freezing.
What is lemon curd?
Lemon curd is a thick, custard-like spread made from citrus juice, sugar, eggs, and butter. It has a smooth, velvety texture and a balance of sweet and tart flavors.

While lemon curd can technically be made using other citrus fruits, lemon produces the most consistent flavor and color. Because the recipe contains egg yolks, lemon curd will naturally be yellow regardless of the citrus used.
When prepared using the correct ratios and temperatures, lemon curd is safe to can and stores well for short-term pantry use.
Is Lemon Curd Safe for Water Bath Canning?
Yes, lemon curd is safe for water bath canning when prepared using the tested NCHFP method.
This safety depends on:
- A specific egg-to-acid ratio
- Cooking the curd to 170°F
- A controlled heat-up time in the canner
- A full 15-minute boiling water bath process
Because lemon curd is both acidic and heat-processed, it meets safety requirements when these steps are followed precisely. Substituting ingredients or altering processing times is not recommended.
Homemade Lemon Curd Ingredients
Complete measurements and step-by-step instructions are included in the recipe card at the bottom of this post.

Egg yolks and whole eggs. Both are used to thicken the curd and give it its rich, smooth texture and vibrant color. Duck eggs were used in this recipe, but any large chicken egg works well.
Fresh lemons. Fresh lemon juice and zest are required. Bottled juice is not recommended. Organic lemons are preferred since the zest is used.
Sugar. Balances the acidity of the lemons and contributes to proper texture.
Cold butter. Unsalted butter produces the best flavor and helps create a smooth, creamy curd while preventing the eggs from cooking too quickly.
Lemon Curd Recipe and Canning Instructions

Canning lemon curd differs slightly from canning jams and jellies. Part of the safety of this recipe relies on the amount of time it takes the canner to reach a boil, which allows the curd to reach the correct internal temperature.
Prepare canner, jars, and lids. Wash four half-pint jars and lids in hot, soapy water. Place jars in a water bath canner, fully submerged.
Heat the water to 180°F and hold it at this temperature while preparing the lemon curd. Do not allow the canner to boil at this stage.
A thermometer capable of reading at least 180°F is required. A candy thermometer works well.
Make the lemon curd. Heat a few inches of water in the bottom of a double boiler over low heat.
In the top of the double boiler, whisk together egg yolks and whole eggs. Add sugar and lemon zest and whisk thoroughly. Stir in fresh lemon juice and cold butter pieces.
Place the top bowl over simmering water and cook over medium-low heat, whisking continuously. Continue cooking until the mixture reaches 170°F, about 10 to 15 minutes. Remove from heat and whisk for another 3 to 5 minutes as the curd thickens to a pudding-like consistency.
Fill and process jars. Ladle hot lemon curd into hot half-pint jars, leaving ½ inch headspace. Wipe rims, apply lids, and finger-tighten rings. Place jars into the canner held at 180°F, ensuring jars are covered by at least 1 inch of water.
Increase heat and bring the canner to a full boil. This should take 25 to 30 minutes. Once boiling, process jars for 15 minutes at a full rolling boil.
Turn off heat, remove the lid, and allow jars to rest in the canner for 5 minutes. Remove jars and let them sit undisturbed for 12 hours before checking seals.
Storing Lemon Curd

Unlike most jams and jellies, canned lemon curd has a shorter shelf life.
For best quality:
- Store sealed jars for 3 to 4 months
- Expect some color fading or separation over time
If jars fail to seal:
- Refrigerate for up to 1 month
- Freeze for up to 1 year
Ways to Use Lemon Curd
Lemon curd is incredibly versatile. Some favorite uses include:
- Spreading on biscuits, toast, or scones
- Swirling into yogurt, whipped cream, or ice cream
- Filling crepes or tarts
- Layering into trifles
- Filling cupcakes or cakes
More Citrus Canning Recipes
📖 Recipe

Lemon Curd for Canning
This tested lemon curd recipe is smooth, creamy, and perfectly balanced between sweet and tart. Made with fresh lemons, eggs, and butter, it follows the approved National Center for Home Food Preservation method for safe water bath canning. Ideal for spreading, baking, and gift-giving, this lemon curd can be stored short-term in the pantry or frozen for longer storage.
Ingredients
- 6 Egg Yolks
- 3 Whole Eggs
- 2 Cups Sugar (fine is best)
- 3 tablespoon Lemon Zest (about 3 lemons)
- 1 Cup Lemon Juice (about 6 lemons)
- 6 tablespoon Butter
Instructions
- Prepare jars, lids, and water bath canner. Bring the canner to 180°F and keep it steady at that temperature.
- Place two to three inches of water in the bottom of a double boiler and begin heating the bottom over medium-low heat while you prepare the lemon curd.
- In the top of the double boiler, off the heat, whisk together the egg yolks and whole eggs.
- Add the sugar and lemon zest to the eggs and whisk thoroughly to combine.
- Add the lemon juice and butter to the mixture and place it on top of the heating bottom of the double boiler. Whisk constantly and heat the mixture to 170°F.
- Once the mixture reaches 170°F, remove the top of the boiler from the heat and continue whisking for five minutes while the mixture continues to thicken.
- Ladle the hot curd into prepared half-pint jars, leaving ½ inch of headspace. Wipe jar rims, center lids, and finger-tighten rings.
- Place the jars into the canner heated to 180°F, cover with the lid, and bring the canner to a boil. This should take approximately 25 to 35 minutes.
- Once boiling, process the jars for 15 minutes. Turn off the heat, remove the lid, and allow jars to sit for 5 minutes before transferring to a towel-lined counter.
- After 12 hours, check for proper seals and remove rings. Unsealed jars may be refrigerated or frozen. Sealed jars will store for up to four months.
Notes
This recipe is only approved for canning in half-pint quantities. It should make approximately four half-pint jars. If one is a little short, simply place it in the refrigerator for immediate use.
The recipe will not set up very well if you try to double it, but larger quantities can be safely canned.
Because of the nature of this product, it can only be stored for a few months before it begins to discolor and separate.
Keeping the canner at, and not allowing it to go over 180°F is important for the process of this canning recipe!
Nutrition Information:
Yield:
32Serving Size:
2 TbspAmount Per Serving: Calories: 94Total Fat: 3gSaturated Fat: 2gUnsaturated Fat: 1gCholesterol: 46mgSodium: 23mgCarbohydrates: 16gFiber: 0gSugar: 16gProtein: 1g
Nutrition information is provided as a courtesy and is an estimate only. Values may vary based on ingredients, brands, and preparation methods and should not be considered a substitute for professional advice.


Angie A says
Oh my....so yummy! I was a little intimidated but followed you directions step by step and it turned out great! Can't wait to try it in recipes! Canned 4 half pints!
I plan on making more!
Danielle McCoy says
Yay! So glad you took on the task, it's not too bad, it just kind of looks like it might be difficult. Glad you enjoyed it and have fun making more!
dani says
Wow! great tutorial. I loved all the tips and the easy to follow steps Thank you
Danielle McCoy says
You're so welcome! Glad it helped!
Lauren says
I just made this recipe and it turned out delicious! The lemony taste and the smoothness of the butter make it melt in your mouth good. Although I would say if there was an option to lessen the sugar I think it would be a little better for people who are trying to lessen their sugar intake. It is very sweet.
Sheri B. says
What a great recipe! I wanted a small batch recipe to use up the egg yolks leftover from an angel food cake. Everything turned out perfectly. I got 4 full half pints. Had to use the scrapper to get every last bit! Thanks!